
I don't know if I've told you guys this almost every single day for the last month but… WE'RE GOING TO WALT DISNEY WORLD! Like, tomorrow!
Yay! We've so, so excited about this trip because we'll be staying in a rented RV at The Fort (an onsite Disney deluxe resort for RVs and camping only) plus, the kids are old enough to do a couple of character meals.
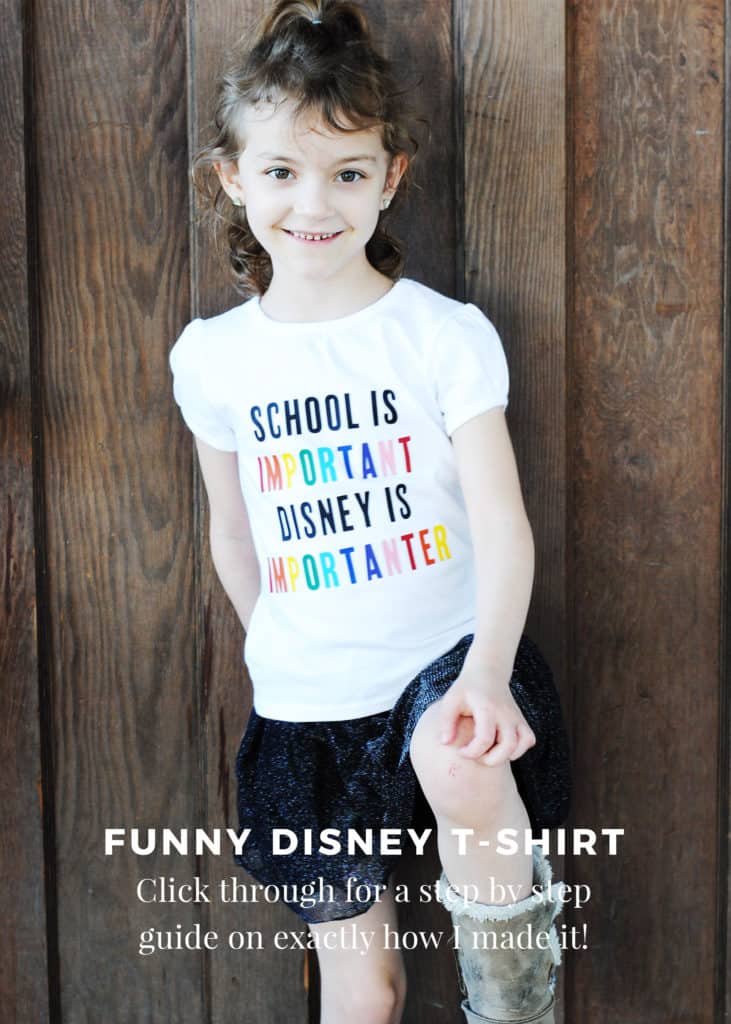
And y'all KNOW that I had to make a cute little sumpin' sumpin' for my Disney obsessed little girl.
At that time, Melanie had used five of her allotted eight unexcused absences from her school in Texas (not a big deal since she struggled with kindergarten anyway) to go so…
I thought I'd make a little joke of it and DIY this funny “School is Important. Disney is Importanter.” t-shirt to commemorate our trip.
Want one of your own? I've included the step-by-step directions, free file, and supply list for you!
// I may earn money from the companies mentioned in this post. //

DIY Your Own School is Important Disney is Importanter T-Shirt
Supplies:
- Cricut Maker
- Black Everyday Iron-On
- Red, Orange, Yellow, Green, Blue, Purple, and Pink Everyday Iron-On
- 12″x12″ Standard Cutting Mat
- Brayer
- Weeding Tool
- 9″x9″ EasyPress 3 and 12″x12″ EasyPress Mat
- Blank T-Shirt


DIY Your Own School is Important Disney is Importanter T-Shirt
Discover our DIY Disney t-shirt that humorously emphasizes the importance of school while enjoying a memorable trip to Walt Disney World.
Materials
Instructions
- Design The Cut File
- Make The Cuts
- Prep and Load Your Mat For Cutting
- Weeding Your Phrase
- Adding The Basic Iron-On Design To The Blank T-Shirt
- Adding The Different Colors of Everyday Iron-On Design To The Blank T-Shirt
Click over to use the cut file that I created and uploaded into Cricut Design Space (adjust the font, size, alignment, etc. as needed to fit the size of your T-shirt).
Click the green “Make It” button in the upper right corner. This will send all the layers of your text to the mat. Next, under “Material Size”, select “12 x 12 in.”.
Then, select the “Mirror” option (this cuts out the text backwards – which then gets applied to your T-shirt with the text reading the standard way).
Now, click the green “Continue” button on the bottom right.
Big Fat Tip: You will need to click the "Edit" link on each mat and select the "Mirror" option EVERY SINGLE TIME, for every single mat.
Take the protective film off the 12"x12" Standard Cutting Mat and adhere a piece of the Black Everyday Iron-On on it (apply the iron-on FACE DOWN so the clear liner is against the mat). Be sure to use the Brayer to press it down all over to make it stick completely.
Next, select the green “Browse All Materials” link option from the “Select Material” option. Select “Iron-on” and click the green “Done” button. Then, be sure to load your fine tip blade securely into the slot on the right in your Cricut Maker.
Now, use the arrows button on your Cricut Maker to gently load the mat. Once the loaded, the “Cricut” button on your Cricut Maker will blink – push it to begin cutting.
Once the Cricut Maker is finished cutting, click the arrow button on the machine to unload the mat. Carefully peel the iron-on from the mat (this is easily done by peeling the MAT from the material [instead of the material from the mat]).
Be sure to keep the Black Everyday Iron-On on the clear plastic liner - your phrase will appear backwards).
Repeat this process but use Red, Orange, Yellow, Green, Blue, Purple, and Pink Everyday Iron-On for each layer of text (I do this so I can have a complete collection to choose from when it comes to layering the Red, Orange, Yellow, Green, Blue, Purple, and Pink Everyday Iron-On letters on top of the Black Everyday Iron-On letters).
Use a Weeding Tool to remove all the negative space material (everything you DO NOT want to appear on the T-shirt design).
If needed, use a BrightPad to see the cut lines for easier removal.
Place your cut and weeded basic graphic on your Blank T-Shirt (remember that since you had it cut out as a mirror image, that it will now be placed on the Blank T-Shirt with the graphic the right way and the clear plastic liner facing up).
Use the 9"x9" EasyPress 3 (with a 12"x12" EasyPress Mat between the Blank T-Shirt layers) to gently press transfer the graphic on to the Blank T-Shirt.
The setting for the Basic Everyday Iron-on on the 9"x9" EasyPress 3 is for 315 degrees F.
Preheat the area where your graphic will be going for 5 seconds with the 9"x9" EasyPress 3.
Press for 30 seconds on the front of the Blank T-Shirt and then, turn the Blank T-Shirt inside out, and press for 15 seconds using medium pressure both times.
Peel off the clear liner once it's warm to the touch.
Big Fat Tip: Hang on to the liner - you'll need it for the next step.
Now, you'll be adding your different color letters on top of the already adhered black letters. This will take some extra (and tedious) work but is totally worth it in the end.
First, take your first color and use scissors to trim between the two letters. The Maker will have cut two "I"s next to each other but you need them to appear on separate layers so cut between them to make two separate pieces.
Use a Weeding Tool to remove all the negative space material (everything you DO NOT want to appear on the Blank T-Shirt design).
Repeat for every letter set.
Place your cut and weeded color letters on your T-Shirt (remember that since you had it cut out as a mirror image, that it will now be placed on the T-Shirt with the graphic the right way and the clear plastic liner facing up).
Big Fat Tip: If you're using my original file with no edits then the color letters are intended to layer on top of the black letters with the tiniest sliver of black showing.
Use the leftover liner pieces from the previous step to cover up the rest of the already ironed on design. This will protect it from direct heat.
Use the 9"x9" EasyPress 3 (with a 12"x12" EasyPress Mat between the T-Shirt layers) to gently press transfer the graphic on to the T-Shirt.
The setting for the Colorful Everyday Iron-on on the 9"x9" EasyPress 3 is for 315 degrees F.
Preheat the area where your graphic will be going for 5 seconds with the 9"x9" EasyPress 3.
Press for 30 seconds on the front of the T-Shirt and then, turn the T-Shirt inside out, and press for 15 seconds using medium pressure both times.
Peel off the clear liner once it's cold to the touch. I repeat, DO NOT PEEL THE LINER OFF UNTIL IT IS COLD TO THE TOUCH. Otherwise, you'll peel the entire design off.
Recommended Products
As an Amazon Associate and member of other affiliate programs, I earn from qualifying purchases.
-
 Cricut Unisex Kids Youth T-shirt
 -
Cricut EasyPress 3 Heat Press Machine (9"x 9") with Heat Press Mat (12" x 12")
-
Cricut Joy Starter Tool Kit
-
Cricut Brayer & MAT Remover Set
-
Cricut StandardGrip Machine, 12"x12", 2 Mats, Green
-
Cricut® Value Iron-On Vinyl, Rainbow Sampler - 12 in x 3 ft (10 ct)
-
Cricut Bright Pad
-
Cricut Maker Value Bundle


I love this shirt. I LURVE THIS SHIRT. I am halfway tempted to let her wear it to school today instead of packing it away for Disney.
I mean, her teacher already hates us and so why not?


Leave a Reply