
Those of you who have followed my wedding planning from the beginning know that I wanted to have something tangible and lasting AFTER the whole shebang was over (I mean, next to a kick ass husband).
Sure, we have gorgeous photos and a couple of little bits of decor smattered around the house but I really wanted something sentimental and personal to look at and love long after our vows. Finally, I settled on a wedding quilt.
Wedding Wednesday: Our Wedding Quilt and a Short DIY
I should point out that EVERYONE told me not to do this – and I'm SO glad that I ignored them all and went after it full steam ahead. I adore my wedding quilt and look forward to sharing it our children.
Here's how I made it happen:
1. I designed a very simple RSVP card that included this message on the back, “Please share a small scrap of fabric from your life with us as we begin our new life together.” and a small coin envelope for the fabric scrap.

Many people recommended that I dictate exact fabric dimensions but I elected to just work with whatever showed up – I wanted to make it as easy as possible for people to find and send us their fabric.
2. Once the fabric scraps started arriving, I saved them all together in a plastic bag. I also saved the RSVP envelopes since many people jotted a quick note about their fabric and why they were sending that specific one (I later made them into a mini album).
Once I had a reasonable stack of fabrics, I started cutting. This was actually the hardest part of this whole project (other parts were just tedious) because I had to guesstimate an average “finished scrap size” and hope that when other fabric pieces came in, they would fit in that size.
I ended up going with a 2″x4″ rectangle and cut ALL the fabric pieces to match that size (whenever possible, I cut multiple pieces from one fabric scrap).

3. I repeated step two with every fabric scrap that came in and also scoured my personal scrap stash to up the final fabric rectangle count. Basically, I cut my ass off.
Some people send large fabric scraps that needed to stay in one piece to make sense (i.e. a giant gingham square with an embroidered lobster on it [ala my high school bestie's prom dress material] and a chunk of one of my dad's many Western style shirts with an embroidered stallion on the pocket) so I left those alone.
Some people sent interesting fabric bits that didn't quite work as a rectangle (i.e. part of a Boston Red Sox 2004 World Series cap [with the signature “B” intact] and a felt heart) so I left those alone, too.
4. Next, I started sewing the rectangle scraps together. I had no plan or sketch for this quilt so I just started sewing crap together.
I placed two scraps right sides together and stitched a 1/4″ seam along the long side (never sewing two of the same type of fabrics together).


When I had a stack of them, I would take a moment and press the seams open with an iron.

5. Then, once I had every single rectangle scrap sewn to another one, I laid one two-piece section right sides together with another section (never letting the same two types of fabrics next to each other) and stitched a 1/4″ seam along the short side.
Once those are all done, press those new seams open with your iron.

6. Moving on, lay one four-piece section right sides together with another four-piece section (again, never letting the same two types of fabrics next to each other) and stitch a 1/4″ seam along the long side.
Press all the new seams open.

7. Continue this pattern of stitching the large sections right sides together and then pressing the seams open. Do this until you have whatever size rows you're looking for.
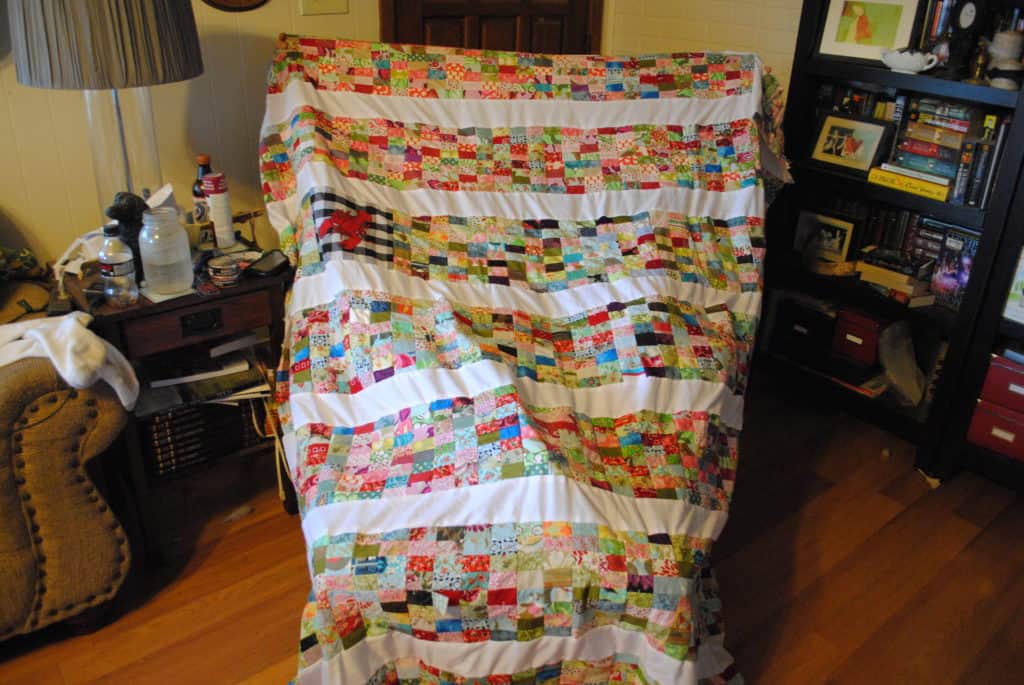
I did 8 horizonal rectangles high by 56 rectangles wide. Ultimately, I ended up with 8 massive rows total.
During this time, I also omitted rectangle scraps in certain areas so I could include those previously mentioned large fabric pieces into the middle-ish of the scrap rows.
I also stitched those random elements (the heart and B) on top of some of the rectangle scrap fabric rows.
8. Next, I elected to showcase the colorful fabric scraps by offsetting them with plain white sashing. Sashing is simple – it's just rows or strips of a plain color fabric used around more colorful patches or pieces.
To do this for my quilt, I bought a plain white fabric sheet set (flat and fitted) in a queen size. I saved the flat sheet to use as the backing and then cut up the fitted sheet into 4″ tall strips (I eyeballed the widths… because I was too damn lazy to measure).
I did 12 total (7 for sashings and 4 to run around the outside of the quilt as a border).


9. I stitched all the sashings and borders together using a 1/4″ seam.

Press all the seams open.
10. Next came the quilting part. I don't hand quilt (I never learned how) so I generally pick the easiest possible quilting pattern to do.
In this case, after I layered my top quilt on to an old blanket of The Boy's and that new flat sheet, I pinned the layers together with safety pins (generally you'd baste the layers together but again… lazy) and just did a super simple quilting pattern that followed the main rows and sashings.


11. Now comes the bias edging. I nixed the more traditional “one piece of fabric for the bias” and instead used some of the cloth napkins from my wedding.
I removed the seams and cut them into 6″x12″ rectangles. Then I stitched the rectangles together along the short ends until I had a LONG length of fabric.
Next, I ironed the bias fabric in half, lengthwise, so that the wrong sides were together. Then I sewed the entire length along the sides of the quilt using a 1/4″ seam and turning the corners.

12. The last little bit of the quilt I did do by hand. Using and invisible stitch, I turned the bias ending over the raw seam and handsewed it to the back of the quilt.
This was super time consuming but I think that you just can't get that nice, clean, finished look here by machine.
13. And voila! It is done! I adore this quilt and all the sweet little memories and stories that our guests sent along in the form of fabric scraps.
For example, someone sent us a bit from the first curtains they purchased after they got married, another a piece of her wedding bouquet sash, and someone else sent us part of a camo top the wore while hunting with The Boy).

Some thoughts about this process:
- I eyeballed this entire thing. That's why you'll see a lot of mismatched seams and a few chopped off rectangles. I just didn't have access to my fancy quilting tools and had to settle for a perfectly imperfect quilt. I'm fine with that decision.
- There's A LOT of ironing in this project. A LOT. Be prepared.
- Don't waste your money on batting or fancy backing fabrics. Use old blankets and sheets. Personally, I only ever buy batting or backing fabric for baby quilts that I'm making as a gift.
- Doing a quilt like this require TONS of different types of fabrics. I have lots of scraps in my personal stash and I needed every single one to make sure that no two fabrics ended up next to each other.
- Did I mention the ironing? OY.
- This quilt wasn't finished in time for the wedding (the individual rows were but not the finished top/whole quilt) and guests kept asking about it. I ended up hauling out the rows for people to look at but, in hindsight, I wish I had made some kind of a display out of the finished rows so people would enjoy them.


Leave a Reply